
After my last article regarding Ceph deployments, I have decided to talk with you about a new capability that is now available on Ceph Octopus upstream version and will be available on later the RHCS versions as well, called cephadm. This new capability will allow you to deploy a whole Ceph cluster in under 10 minutes. cephadm is a deployment tool that is here to make you life much easier when dealing with Ceph cluster deployments, It uses Podman in order to run all the Ceph daemons, and the deployment management is done via an SSH connection. There are a lot of advantages to running Ceph with containers, mainly when performing an upgrade, having failures, etc. To start using cephadm all you need is a few machines (physical/virtual), a few packages, and an SSH connection between the deployer and the Ceph cluster machines.
Game on!
Requirements
machines:
- A bastion/deployer machine
- Ceph cluster machines (depending on your choice, could be both collocated or non-collocated)
for each one of the machines:
- python3
- Podman
- lvm2
Installation
Download the cephadm binary and turn permissions into executable:
$ curl --silent --remote-name --location https://github.com/ceph/ceph/raw/octopus/src/cephadm/cephadm
$ chmod +x cephadm
Use the cephadm binary in order to add the needed repository:
$ ./cephadm add-repo --release octopusINFO:root:Writing repo to /etc/yum.repos.d/ceph.repo...
INFO:cephadm:Enabling EPEL...
Install the cephadm package, so that the binary will show up in your $PATH:
$ ./cephadm installINFO:cephadm:Installing packages ['cephadm']...
Install the ceph-common package using cephadm so that you will be able to run Ceph commands:
$ cephadm install ceph-common
Create the data directory for Ceph in the bootstrap machine, so that the installation process will have a directory to write the config files:
$ mkdir -p /etc/ceph
Now, after we have set up all the prerequisites, we can start the boostrap process:
$ cephadm bootstrap --mon-ip 192.168.42.10
INFO:cephadm:Verifying podman|docker is present...
INFO:cephadm:Verifying lvm2 is present...
INFO:cephadm:Verifying time synchronization is in place...
INFO:cephadm:Unit chronyd.service is enabled and running
INFO:cephadm:Repeating the final host check...
INFO:cephadm:podman|docker (/bin/podman) is present
INFO:cephadm:systemctl is present
INFO:cephadm:lvcreate is present
INFO:cephadm:Unit chronyd.service is enabled and running
INFO:cephadm:Host looks OK
INFO:root:Cluster fsid: 350494de-d23f-11ea-be85-525400d32681
INFO:cephadm:Verifying IP 192.168.42.10 port 3300 ...
INFO:cephadm:Verifying IP 192.168.42.10 port 6789 ...
INFO:cephadm:Mon IP 192.168.42.10 is in CIDR network 192.168.42.0/24
INFO:cephadm:Pulling container image docker.io/ceph/ceph:v15...
INFO:cephadm:Extracting ceph user uid/gid from container image...
INFO:cephadm:Creating initial keys...
INFO:cephadm:Creating initial monmap...
INFO:cephadm:Creating mon...
INFO:cephadm:Waiting for mon to start...
INFO:cephadm:Waiting for mon...
INFO:cephadm:mon is available
INFO:cephadm:Assimilating anything we can from ceph.conf...
INFO:cephadm:Generating new minimal ceph.conf...
INFO:cephadm:Restarting the monitor...
INFO:cephadm:Setting mon public_network...
INFO:cephadm:Creating mgr...
INFO:cephadm:Wrote keyring to /etc/ceph/ceph.client.admin.keyring
INFO:cephadm:Wrote config to /etc/ceph/ceph.conf
INFO:cephadm:Waiting for mgr to start...
INFO:cephadm:Waiting for mgr...
INFO:cephadm:mgr not available, waiting (1/10)...
INFO:cephadm:mgr not available, waiting (2/10)...
INFO:cephadm:mgr not available, waiting (3/10)...
INFO:cephadm:mgr not available, waiting (4/10)...
INFO:cephadm:mgr is available
INFO:cephadm:Enabling cephadm module...
INFO:cephadm:Waiting for the mgr to restart...
INFO:cephadm:Waiting for Mgr epoch 5...
INFO:cephadm:Mgr epoch 5 is available
INFO:cephadm:Setting orchestrator backend to cephadm...
INFO:cephadm:Generating ssh key...
INFO:cephadm:Wrote public SSH key to to /etc/ceph/ceph.pub
INFO:cephadm:Adding key to root@localhost's authorized_keys...
INFO:cephadm:Adding host mon0...
INFO:cephadm:Deploying mon service with default placement...
INFO:cephadm:Deploying mgr service with default placement...
INFO:cephadm:Deploying crash service with default placement...
INFO:cephadm:Enabling mgr prometheus module...
INFO:cephadm:Deploying prometheus service with default placement...
INFO:cephadm:Deploying grafana service with default placement...
INFO:cephadm:Deploying node-exporter service with default placement...
INFO:cephadm:Deploying alertmanager service with default placement...
INFO:cephadm:Enabling the dashboard module...
INFO:cephadm:Waiting for the mgr to restart...
INFO:cephadm:Waiting for Mgr epoch 13...
INFO:cephadm:Mgr epoch 13 is available
INFO:cephadm:Generating a dashboard self-signed certificate...
INFO:cephadm:Creating initial admin user...
INFO:cephadm:Fetching dashboard port number...
INFO:cephadm:Ceph Dashboard is now available at:	     URL: https://mon0:8443/
	    User: admin
	Password: miff2x27mbINFO:cephadm:You can access the Ceph CLI with:	sudo /bin/cephadm shell --fsid 350494de-d23f-11ea-be85-525400d32681 -c /etc/ceph/ceph.conf -k /etc/ceph/ceph.client.admin.keyringINFO:cephadm:Please consider enabling telemetry to help improve Ceph:	ceph telemetry onFor more information see:	https://docs.ceph.com/docs/master/mgr/telemetry/INFO:cephadm:Bootstrap complete.
As you see, the bootstrap process covers a few important phases:
- Verify you have all the needed packages mentioned in the prerequisites section
- Check that the bootstrap machine has the needed ports open for the mon (6789, 3300)
- Pull the container image so that it can run the mon daemon
- Write all the config files to the
/etc/cephdirectory - Start and configure the mgr and the mgr modules
- Pull all dashboard images and deploy them
Now let’s verify that cephadm indeed use containers to run the Ceph cluster by running podman ps from the bootstrap machine:
$ podman psCONTAINER ID  IMAGE                                COMMAND               CREATED                 STATUS                     PORTS  NAMES
78a10d841dcc  docker.io/ceph/ceph:v15              -n client.crash.m...  Less than a second ago  Up Less than a second ago         ceph-350494de-d23f-11ea-be85-525400d32681-crash.mon0
93271bd6d05d  docker.io/prom/alertmanager:v0.20.0  --config.file=/et...  2 seconds ago           Up 1 second ago                   ceph-350494de-d23f-11ea-be85-525400d32681-alertmanager.mon0
e9cf42c01896  docker.io/ceph/ceph:v15              -n mgr.mon0.hoiqb...  About a minute ago      Up About a minute ago             ceph-350494de-d23f-11ea-be85-525400d32681-mgr.mon0.hoiqba
eb1977509d8c  docker.io/ceph/ceph:v15              -n mon.mon0 -f --...  About a minute ago      Up About a minute ago             ceph-350494de-d23f-11ea-be85-525400d32681-mon.mon0
The installation will generate a minimal ceph.conf file that will be sufficient for the bootstrap phase only, Let’s take a look of it:
$ podman exec -it ceph-350494de-d23f-11ea-be85-525400d32681-mon.mon0 cat /etc/ceph/ceph.conf# minimal ceph.conf for 350494de-d23f-11ea-be85-525400d32681
[global]
	fsid = 350494de-d23f-11ea-be85-525400d32681
	mon_host = [v2:192.168.42.10:3300/0,v1:192.168.42.10:6789/0]
Now, after we have put the bootstrapped cluster, we can use the cephadm shell command, to treat our cluster as a daemonized Ceph cluster. To do so, Let’s create an alias:
alias ceph='cephadm shell -- ceph'
Now let’s run the ceph -v command to see if we get an answer:
$ ceph -v
ceph version 15.2.4 (7447c15c6ff58d7fce91843b705a268a1917325c) octopus (stable)
After we have our bootstrapped cluster, It’s time for us to start adding some servers to our cluster. Before we do that, let’s label our mon as mon daemon:
$ ceph orch host label add mon0 mon
And now let’s schedule a job that will deploy the mon in the mon0 server:
$ ceph orch apply mon mon0Scheduled mon update...
We can list the servers that are being managed by cephadm using the host ls command:
$ ceph orch host lsHOST  ADDR  LABELS  STATUS
mon0  mon0  mon
We see that we have the mon running, and it has the mon label. Now we can start adding our OSDs 🙂 The bootstrap process generated an ssh key, to add those servers we need to distribute our ceph.pub public key that was created previously:
$ ssh-copy-id -f -i /etc/ceph/ceph.pub osd1
$ ssh-copy-id -f -i /etc/ceph/ceph.pub osd2
$ ssh-copy-id -f -i /etc/ceph/ceph.pub osd3
Let’s add those servers so the cephadm could manage them:
$ ceph orch host add osd0
Added host 'osd0'$ ceph orch host add osd1
Added host 'osd1'$ ceph orch host add osd2
Added host 'osd2'
After adding those OSDs, we can see that cephadm will collect information on each server’s disks. There are some standards to what is considered as available device, which means a device which cephadm could deploy an OSD on (Written in the documentation of cephadm). Now let’s use the device ls command to watch the available disks:
$ ceph orch device lsHOST  PATH      TYPE   SIZE  DEVICE                 AVAIL  REJECT REASONS
mon0  /dev/vda  hdd   41.0G                         False  locked
osd0  /dev/sda  hdd   50.0G  QEMU_HARDDISK_QM00001  True
osd0  /dev/sdb  hdd   50.0G  QEMU_HARDDISK_QM00002  True
osd0  /dev/sdc  hdd   50.0G  QEMU_HARDDISK_QM00003  True
osd0  /dev/vda  hdd   41.0G                         False  locked
osd1  /dev/sda  hdd   50.0G  QEMU_HARDDISK_QM00001  True
osd1  /dev/sdb  hdd   50.0G  QEMU_HARDDISK_QM00002  True
osd1  /dev/sdc  hdd   50.0G  QEMU_HARDDISK_QM00003  True
osd1  /dev/vda  hdd   41.0G                         False  locked
osd2  /dev/sda  hdd   50.0G  QEMU_HARDDISK_QM00001  True
osd2  /dev/sdb  hdd   50.0G  QEMU_HARDDISK_QM00002  True
osd2  /dev/sdc  hdd   50.0G  QEMU_HARDDISK_QM00003  True
osd2  /dev/vda  hdd   41.0G                         False  locked
We see that in each disk we have three available devices (data devices) while all the rest are locked (used for the OS), cephadm will find out by itself, there is no need to configure that. Now, after we have verified we have three disks for each OSD server, we should have eventually 9 OSD daemons, let’s tell cephadm to use all the available devices as OSDs:
$ ceph orch apply osd --all-available-devices
Now let’s test it a bit with running RGW daemon that will expose an S3 interface:
$ radosgw-admin realm create --rgw-realm=default --default
$ radosgw-admin zonegroup create --rgw-zonegroup=default --master --default
$ radosgw-admin zone create --rgw-zonegroup=default --rgw-zone=us-east-1 --master --default
$ ceph orch apply rgw default us-east-1 --placement="1 mon0"
Give cephadm a minute or two to deploy those daemons, and eventually let’s use the ceph status command, in order to verify our cluster, is healthy:
$ ceph status  cluster:
    id:     350494de-d23f-11ea-be85-525400d32681
    health: HEALTH_OK

  services:
    mon: 1 daemons, quorum mon0 (age 3h)
    mgr: mon0.hoiqba(active, since 3h), standbys: osd0.roeylr
    osd: 9 osds: 9 up (since 3h), 9 in (since 3h)
    rgw: 1 daemon active (default.us-east-1.mon0.jypopv)

  task status:

  data:
    pools:   7 pools, 145 pgs
    objects: 213 objects, 6.2 KiB
    usage:   9.3 GiB used, 441 GiB / 450 GiB avail
    pgs:     145 active+clean
Great! we have a fully functional cluster 🙂
In those commands, we have created all the RGW configuration that is needed for us to start using S3. Now we’ll use the awscli tool to start interacting with our S3 interface. Install the awscli binary:
$ yum install awscli
Create a RGW user using radosgw-admin command:
$ radosgw-admin user create --uid=shon --display-name=shon --access-key=shon --secret-key=shon
After configuring awscli with the valid credentials (don’t forget the region), we can now create a bucket:
$ aws s3 mb s3://shon-test --endpoint-url http://mon0make_bucket: shon-test
Now let’s upload an object for example:
$ aws s3 cp /etc/hosts s3://shon-test --endpoint-url http://mon0upload: ../etc/hosts to s3://shon-test/hosts
Great! we have our S3 Object Storage interface up and running!
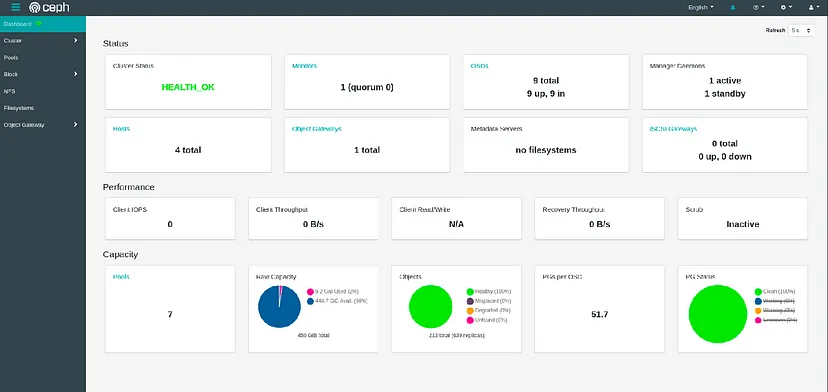
Let’s verify that our Dashboard is available as well (the endpoint is provided at the end of the bootstrap process:
Conclusion
We saw how we can deploy a fully functional Ceph cluster in 10 minutes. There is important flexibility when running Ceph with containers, mainly in terms of upgrades, failures, etc. With cephadm we can have an interactive CLI to deploy a Ceph cluster with only a few commands, try it on your own, and see how easy it is! Hope you have enjoyed this demo, see ya next time 🙂
https://shonpaz.medium.com/deploy-a-ceph-cluster-within-minutes-using-cephadm-53e3b915416f